
 |
| Ukrainian - Pysanky Eggs |
 It's that time of year again. I've ordered more dyes, though I still have last year's dyes jarred in a box in the garage. Since more people are going to be coming to our home to do eggs this year, I thought I'd get some fresh dye. We'll use both.
I saw an article in a 1973 National Geographic Magazine on Ukrainian eggs, and wanted to do them. Since I knew how to do Batik textile art, I understood the process, but didn't know special tools existed. As is typical of me, I just jump in and do things. I got beeswax and melted it in a metal measuring cup and stood over the stove painting the wax on eggs. And the only dyes I new of were the typical grocery store Paas (?- I think that's what it is) dyes. Monte joined in the process when we were dating.

Soon after we were married I found the traditional kistka tools and special dyes. For years now we've been ordering supplies from the same store, and have bought kits for wedding presents. We've also bought a lot of extra tools and leave the dyes out for about a month and have had many people around our dining table decorating eggs. One couple, years ago so looked forward to it they started designing eggs months beforehand. When they moved away they bought their own kit and have done it every year.


Though electric kistkas exist, it's traditionally done by heating the metal funnel of the kistka over a candle till the beeswax is melted. It does not run out until it touches the egg. It's a wax-resist process, starting from lightest and getting progressively darker. You initially wax over everything you want white and put egg in yellow, once dry, you wax over what you want to stay yellow, and so on. When done you hold the egg to the side of the candle and wipe the melting wax off with a paper towel. The eggs are raw and they dry out over time.
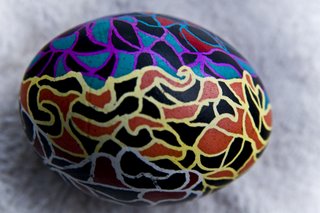
 This picture is just one of the three cartons that got done several years ago. That was a very productive and artistic weekend of eggs - Travis had several couples come and stay several days to dye eggs (and enjoy just hanging out, of coarse). Dawson has friends come too. Everyone loves it! I've gotten emails from both boys this year - going to be bringing friends again!
I cap the canning jars of dye and repack the box. I store them along with the old silver spoons, candles and candle-holders, box of tools and instructions and pictures, and then the vinyl tablecloth. It can be pulled out anytime. Every year I say I'm going to do it for Christmas ornaments - but I haven't yet.
Several years ago Monte made a shelf for the eggs to better display than the hanging wire baskets I've always kept them in. The company I order the dyes and tools from, the Ukrainian Gift Shop, has a variety of stands for the eggs. So I got a bunch of the cheap clear plastic stands. Monte is going to make a shelf unit for each of the kids too.


Having done these for years, I never varnished them and finally did a few years ago. It's a final step I've always skipped. So some of the varnished ones are older and already faded. These dyes are toxic, so no eating of the eggs, but are not run-proof, so make sure the varnish is not water-base. We nailed three nails every so often in boards to support the eggs and I use my gloved hands to rub the oil-base varnish on the eggs. (The stands could be used in the oven on low temp for helping melt the beeswax off. I've not tried this - but a book I have shows it.)

No comments:
Post a Comment