Tuesday, December 27, 2011

Christmas Hand-Knit Hats and Scarves and Sock Earrings

Handknit hats for little S and E
 For Christmas gifting I knit some hats and scarves. I used washable variegated sock yarn and a coordinating gray. The lower part of little E's hat has several purled rows, then a couple knit gray rows, so that the sock yarn would come forward and the darker gray retreated. Little S's hat every few rows, after the hat was knit, has chained gray, creating scallops. Then I added the ear flaps and crocheted an edging adding tasseled ties.

Splarah's hand-knit hat and scarf
I took into account Splarah's dark brown hair and blue eyes for her hat design. I bought several varieties of the new ribbon looking "yarn" that pulls out into a lacy effect. It's slower knitting than normal, so it's not something I want to do a lot of, but I supplied several people, including myself some of these scarves.

Little E wore his hand=knit hat all day

Hand-Knit Sock Earrings
I've posted before about these sock earrings I've knit for years. Probably all my friends have a pair now and I've sold some.

Thursday, December 1, 2011

Nuno Felted Scarves

Some day I'll show tutorial steps in nuno felting. I'm still working the art and perfecting it, if there is such a thing. These are some of what I've done ...

Nuno Felted Scarf on cotton gauze


Nuno Felted Scarf on cotton gauze


Tuesday, November 29, 2011

Felted Wreaths

This is my second Christmas of making these wreaths. This year I wet felted the wool to the styrofoam wreath, then needle felted on the details. Some are wrapped with a coordinating wool yarn. I'll make the leaves and some other details separate, needling on a foam pad, then adding them to the wreath.

Felted styrofoam wreaths

Felted styrofoam wreaths - 2 stacked
I've mentioned before, probably in the felted egg post, that the styrofoam needs to be the rough, not the smooth kind for needlefelting.

Monday, May 2, 2011

Felt and Jewelry

In my current felting jag, I made this jewelry set. I'd bought the jewelry blanks at Hobby Lobby. I needle felted a long strip of the blue-green background, then cut it in squares to fit the bracelet blanks and one to fit the necklace blank. Then I needled in the small designs in colors that would go with an outfit I wear. The picture shows the jacket. I'm going to be making more felted jewelry!


Tuesday, April 26, 2011

Greenhouse Gardening

Plant shelf with heat coils and grow lights
I'm back to blogging again. My commitments are past; my color design class, after a year, is over. I've been busy exploring various textile crafts and taking pictures but not taking time to write blogs.

Lettuces and Greens
My plans for now? To get my garden spaces cleaned up and ready for this year's growing season. Spring flowering bulbs are starting to bloom and things are greening up and starting to grow. I anxiously await this time of year ... 'Anxious' because some things die from lack of Winter moisture, or pocket gophers and voles. I have started veggie and flower seedlings in my greenhouse: broccoli, cauliflower, kale varieties, tomato varieties, and favorite flowers.

Herbs
I will not bother with growing carrots, radishes, beets, or lettuce again over winter - too labor intensive and a huge electricity draw for keeping it warm. What I will always keep going tho are herbs. I enjoyed having fresh herbs all winter: chives, parsley, rosemary, cilantro, basil, mint, oregano, sage, and thyme (I should have typed some of those in the song's order ... it's now running in my head!). The grapevine's leaves are filling the entire greenhouse ceiling space and Monte keeps looking for newly forming clusters. The clematis vine that twines into the grapevine is just now starting to flower - it's the deep violet Jackmanii variety. Tomato plants in the corner have been giving us cherry tomatoes, but I don't know if I'll grow them over winter again either.

Entwined together: Potted Fig tree, tomatoes, and grapevine


Mock Orange - been babying over a year; seeds from Monte's family homestead

More Ukrainian Egg Dyeing Info

I'm cleaning up the dining room table of all the Ukrainian Egg dyeing tools. I have a box the jarred dyes return to along with all the kistka tools, candle holders, beeswax, how-to instruction sheets and then the vinyl tablecloth. This year there's cartons of undone raw eggs to put by the box in the garage too. Will I pull it all out to make Christmas tree ornaments next fall? Every year I say I will ... We'll see. Varnished, blown out, and hung with silk cord and tassel would be beautiful!


I took some pictures of eggs that got left. Gary made the egg faces. Most people took home their eggs. I save cartons prior to Easter so they can be cut up for protecting a few eggs. Like most of the gals who came to my Spring Tea did two eggs. Friends stayed on into the evening dyeing more. Then, as I was starting to put everything away the Easter weekend Dawson texted me saying he was "bringing lots of friends to dye eggs ... and by the way, we're staying for supper". I had no plans. We had homemade pizzas for supper - a dessert one with brie, chocolate chips, and sliced cranberry sauce was delicious. I want to make it again for improving the recipe.

Something I thought I should mention, to add to the dyeing instructions I've posted about, is the use of bleach. My boys are big-time into the use of bleaching their eggs. You can see in the above picture the back eggs that are quite white. Most of these started out as black eggs, waxed, and then bleached. Travis's egg with the birds and the sunset below, started out black too. He probably bleached it several times, but beware ... excessive bleaching can weaken the egg shell. I bleached one of mine, wanting a truer green after the scarlet, but I didn't wash the egg after bleaching - with soap and water! Bleach will affect the dyes. My egg didn't take the green dye evenly. I hope I didn't wreak the dark green dye. Monte's still got his serpentenite egg in there ... waiting ...

Sunday, April 17, 2011

Palm Sunday

My wool bean-bag nativity I made is still displayed on an old travel trunk in the dining room. Maybe the trunk will become my seasonal table for differing displays. I don't pack my creche away anymore. There is a high bookshelf above the windows in our great room that it normally sits on except at Christmas.


For Palm Sunday years past I put a Jesus figure I made from wool on a donkey surrounded by paschal lambs on our kitchen table. I'll have two tablecloths at varying angels that are a deep green and purple. I like to bring palm fronds home from church and add them to the table as well. This year I added a cross and nails to the creche scene and Jesus on the donkey with the lambs in front.

Saturday, April 16, 2011

Spring Tea Ukrainian Egg Craft

Merengues spread with jam & cookies
Veggies & 3 dips - boiled small potatoes are the favorite!
I did it again - I had another tea crafting party. Like my Valentine Tea crafting party I posted about, I invited people to tea and learn the art of Ukrainian/Pysanky egg dyeing. Needlefelting was the other craft option. I did a post about the Ukrainian wax resist dye process earlier, so see it for the details. This time I made some desert along with the sandwiches and scones (see my kitchen blog for recipes). The favorite was banana bread spread with Nutella and a Granny Smith apple slice.

Ukrainian Egg Dyeing


Ukrainian Eggs and a Needlefelted Picture


Hanna and Phill needlefelting

Relaxing, eating supper with friends


Dawson using Kistka tool with beeswax on a raw egg

Friday, April 8, 2011

Ukrainian - Pysanky - Egg Dyeing

Ukrainian - Pysanky Eggs
It's that time of year again. I've ordered more dyes, though I still have last year's dyes jarred in a box in the garage. Since more people are going to be coming to our home to do eggs this year, I thought I'd get some fresh dye. We'll use both.

I saw an article in a 1973 National Geographic Magazine on Ukrainian eggs, and wanted to do them. Since I knew how to do Batik textile art, I understood the process, but didn't know special tools existed. As is typical of me, I just jump in and do things. I got beeswax and melted it in a metal measuring cup and stood over the stove painting the wax on eggs. And the only dyes I new of were the typical grocery store Paas (?- I think that's what it is) dyes. Monte joined in the process when we were dating.


Soon after we were married I found the traditional kistka tools and special dyes. For years now we've been ordering supplies from the same store, and have bought kits for wedding presents. We've also bought a lot of extra tools and leave the dyes out for about a month and have had many people around our dining table decorating eggs. One couple, years ago so looked forward to it they started designing eggs months beforehand. When they moved away they bought their own kit and have done it every year.


Though electric kistkas exist, it's traditionally done by heating the metal funnel of the kistka over a candle till the beeswax is melted. It does not run out until it touches the egg. It's a wax-resist process, starting from lightest and getting progressively darker. You initially wax over everything you want white and put egg in yellow, once dry, you wax over what you want to stay yellow, and so on. When done you hold the egg to the side of the candle and wipe the melting wax off with a paper towel. The eggs are raw and they dry out over time.

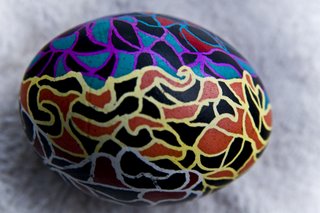
This picture is just one of the three cartons that got done several years ago. That was a very productive and artistic weekend of eggs - Travis had several couples come and stay several days to dye eggs (and enjoy just hanging out, of coarse). Dawson has friends come too. Everyone loves it! I've gotten emails from both boys this year - going to be bringing friends again!


I cap the canning jars of dye and repack the box. I store them along with the old silver spoons, candles and candle-holders, box of tools and instructions and pictures, and then the vinyl tablecloth. It can be pulled out anytime. Every year I say I'm going to do it for Christmas ornaments - but I haven't yet.


Several years ago Monte made a shelf for the eggs to better display than the hanging wire baskets I've always kept them in. The company I order the dyes and tools from, the Ukrainian Gift Shop, has a variety of stands for the eggs. So I got a bunch of the cheap clear plastic stands. Monte is going to make a shelf unit for each of the kids too.


Having done these for years, I never varnished them and finally did a few years ago. It's a final step I've always skipped. So some of the varnished ones are older and already faded. These dyes are toxic, so no eating of the eggs, but are not run-proof, so make sure the varnish is not water-base. We nailed three nails every so often in boards to support the eggs and I use my gloved hands to rub the oil-base varnish on the eggs. (The stands could be used in the oven on low temp for helping melt the beeswax off. I've not tried this - but a book I have shows it.)


Wednesday, April 6, 2011

MOPS NeedleFelting Craft

I've been a MOPS Mentor Mom going on 11 years now. I led the needlefelting craft for my MOPS group today. It was so fun and the gals were gabbing away while creating beautiful felted pictures. Most of them were needled onto craft felt that I provided. I'll glue these onto cardstock and use as cards.


Related Posts Plugin for WordPress, Blogger...