Showing posts with label Holiday. Show all posts

Wednesday, March 21, 2012

Ukrainian Egg Dying

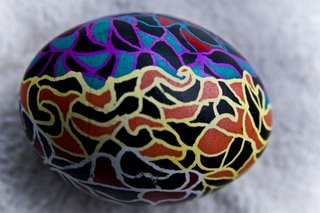
Ukrainian dyed eggs - a wax resist process
It's that time of year again. I'm just home from being gone several weeks with a new grand-daughter born. When at the little grocer I frequent the checkout gal says the fresh hams for Easter have just come in. EASTER! I've not even thought of it, let alone a meal, and who's coming our way. BUT, I also just got an email from my youngest son saying he wants to bring several groups of friends to do eggs this year. I still have the dye in canning jars from last year ... I wasn't going to buy new dye, since they can be reused. But then my other son said the same, "We want to bring some couples to dye eggs". So I'm going to order new dyes to have on hand ... just in case. Like did someone compromise the yellow last year? ...

For years I've ordered my kits/dyes from the Ukranian Gift Shop. And click here to see last years "how-to" post with lots of pics.


Tuesday, April 26, 2011

More Ukrainian Egg Dyeing Info

I'm cleaning up the dining room table of all the Ukrainian Egg dyeing tools. I have a box the jarred dyes return to along with all the kistka tools, candle holders, beeswax, how-to instruction sheets and then the vinyl tablecloth. This year there's cartons of undone raw eggs to put by the box in the garage too. Will I pull it all out to make Christmas tree ornaments next fall? Every year I say I will ... We'll see. Varnished, blown out, and hung with silk cord and tassel would be beautiful!


I took some pictures of eggs that got left. Gary made the egg faces. Most people took home their eggs. I save cartons prior to Easter so they can be cut up for protecting a few eggs. Like most of the gals who came to my Spring Tea did two eggs. Friends stayed on into the evening dyeing more. Then, as I was starting to put everything away the Easter weekend Dawson texted me saying he was "bringing lots of friends to dye eggs ... and by the way, we're staying for supper". I had no plans. We had homemade pizzas for supper - a dessert one with brie, chocolate chips, and sliced cranberry sauce was delicious. I want to make it again for improving the recipe.

Something I thought I should mention, to add to the dyeing instructions I've posted about, is the use of bleach. My boys are big-time into the use of bleaching their eggs. You can see in the above picture the back eggs that are quite white. Most of these started out as black eggs, waxed, and then bleached. Travis's egg with the birds and the sunset below, started out black too. He probably bleached it several times, but beware ... excessive bleaching can weaken the egg shell. I bleached one of mine, wanting a truer green after the scarlet, but I didn't wash the egg after bleaching - with soap and water! Bleach will affect the dyes. My egg didn't take the green dye evenly. I hope I didn't wreak the dark green dye. Monte's still got his serpentenite egg in there ... waiting ...

Sunday, April 17, 2011

Palm Sunday

My wool bean-bag nativity I made is still displayed on an old travel trunk in the dining room. Maybe the trunk will become my seasonal table for differing displays. I don't pack my creche away anymore. There is a high bookshelf above the windows in our great room that it normally sits on except at Christmas.


For Palm Sunday years past I put a Jesus figure I made from wool on a donkey surrounded by paschal lambs on our kitchen table. I'll have two tablecloths at varying angels that are a deep green and purple. I like to bring palm fronds home from church and add them to the table as well. This year I added a cross and nails to the creche scene and Jesus on the donkey with the lambs in front.

Saturday, April 16, 2011

Spring Tea Ukrainian Egg Craft

Merengues spread with jam & cookies
Veggies & 3 dips - boiled small potatoes are the favorite!
I did it again - I had another tea crafting party. Like my Valentine Tea crafting party I posted about, I invited people to tea and learn the art of Ukrainian/Pysanky egg dyeing. Needlefelting was the other craft option. I did a post about the Ukrainian wax resist dye process earlier, so see it for the details. This time I made some desert along with the sandwiches and scones (see my kitchen blog for recipes). The favorite was banana bread spread with Nutella and a Granny Smith apple slice.

Ukrainian Egg Dyeing


Ukrainian Eggs and a Needlefelted Picture


Hanna and Phill needlefelting

Relaxing, eating supper with friends


Dawson using Kistka tool with beeswax on a raw egg

Friday, April 8, 2011

Ukrainian - Pysanky - Egg Dyeing

Ukrainian - Pysanky Eggs
It's that time of year again. I've ordered more dyes, though I still have last year's dyes jarred in a box in the garage. Since more people are going to be coming to our home to do eggs this year, I thought I'd get some fresh dye. We'll use both.

I saw an article in a 1973 National Geographic Magazine on Ukrainian eggs, and wanted to do them. Since I knew how to do Batik textile art, I understood the process, but didn't know special tools existed. As is typical of me, I just jump in and do things. I got beeswax and melted it in a metal measuring cup and stood over the stove painting the wax on eggs. And the only dyes I new of were the typical grocery store Paas (?- I think that's what it is) dyes. Monte joined in the process when we were dating.


Soon after we were married I found the traditional kistka tools and special dyes. For years now we've been ordering supplies from the same store, and have bought kits for wedding presents. We've also bought a lot of extra tools and leave the dyes out for about a month and have had many people around our dining table decorating eggs. One couple, years ago so looked forward to it they started designing eggs months beforehand. When they moved away they bought their own kit and have done it every year.


Though electric kistkas exist, it's traditionally done by heating the metal funnel of the kistka over a candle till the beeswax is melted. It does not run out until it touches the egg. It's a wax-resist process, starting from lightest and getting progressively darker. You initially wax over everything you want white and put egg in yellow, once dry, you wax over what you want to stay yellow, and so on. When done you hold the egg to the side of the candle and wipe the melting wax off with a paper towel. The eggs are raw and they dry out over time.

This picture is just one of the three cartons that got done several years ago. That was a very productive and artistic weekend of eggs - Travis had several couples come and stay several days to dye eggs (and enjoy just hanging out, of coarse). Dawson has friends come too. Everyone loves it! I've gotten emails from both boys this year - going to be bringing friends again!


I cap the canning jars of dye and repack the box. I store them along with the old silver spoons, candles and candle-holders, box of tools and instructions and pictures, and then the vinyl tablecloth. It can be pulled out anytime. Every year I say I'm going to do it for Christmas ornaments - but I haven't yet.


Several years ago Monte made a shelf for the eggs to better display than the hanging wire baskets I've always kept them in. The company I order the dyes and tools from, the Ukrainian Gift Shop, has a variety of stands for the eggs. So I got a bunch of the cheap clear plastic stands. Monte is going to make a shelf unit for each of the kids too.


Having done these for years, I never varnished them and finally did a few years ago. It's a final step I've always skipped. So some of the varnished ones are older and already faded. These dyes are toxic, so no eating of the eggs, but are not run-proof, so make sure the varnish is not water-base. We nailed three nails every so often in boards to support the eggs and I use my gloved hands to rub the oil-base varnish on the eggs. (The stands could be used in the oven on low temp for helping melt the beeswax off. I've not tried this - but a book I have shows it.)


Tuesday, March 22, 2011

Spring Visuals

Every year I used to make a "Firsts of Spring" chart - it is so ingrained in us now that I don't need to make a chart. My kids are adults, yet will text me they saw ... They know how that first bluebird and crocus flower lifts my spirit. YEAH! Winter is over - tho not so winter weather, still to come thru May, tho the in-between days are longer and warmer! Robins have come. I've cleaned out my bird houses for this years tenants. Aspen catkins will soon be budding. Then I look forward to the first hummingbird sound mid-May. I don't look forward to the first smell of a stinkbug.


Years ago too I made some little felt flower people and bunnies. I got the idea from a book I have from the UK. Waldorf schools always have these visual aids for the seasons - like having a seasonal table that is always changing. Kids can go on nature walks and add things to the table. Our kitchen table is usually the seasonal table. I have a wreath hanging over the table that I'll often hang seasonal or holiday things from. For the Fall I made little trolls. They remind my heart that tho nature appears dead in winter, beneath the scenes, nature is regrouping for the next year's new birth to life.

Spring is a fertile season. No baby chicks for us this year, as in years past. No kids are around and I want to have the freedom to go places with Monte and not find caretakers. But in the future? ... I do miss my chickens. Little Johnny Jump-up Violas are some of the first flowers to bloom, along with the crocus. The other little lady is trillium. Then there's the little brown seed-pods.

Thursday, March 17, 2011

St Patrick Quilt

I almost forgot ... it's St Patrick's Day! I made a quilted piece years ago for adorning the dining table at this time. I had some gals over for a tea lunch and felting last Saturday and pulled out this quilt for the table and it's been out since.

When I was looking for patterns, all clover leaf patterns were with four leaves. Since Patrick used a three-leaf clover to talk about the Trinitarian God, I wanted three leaves as well, so had to create my own quilt pattern.

Friday, February 18, 2011

Felted Soap or Soap in a Sweater!

"Soap in a Sweater" - felted soap
Felting over soap is SO easy. I've read and watched several tutorials. I'm going to tell you how I do it. You can use any soap. I've even done it using hotel soaps. But usually I use my homemade soap (which I posted a recipe for at my kitchen blog), primarily because that's the main soap around my house, since I've been making and using my homemade soap for probably twenty years now. Since the last soap I made was heart-shaped, that's what this tutorial will show.

wrap wool tightly around the soap
add some color variety if you want
 Wrap wool tightly around the soap, covering it totally. If you leave it too loose, it'll take longer to tighten/shrink around the soap, and you can end up with some wool flaps that are impossible to adhere to the already felted soap. Once wool is felted it won't accept anymore wool layering, unless you needle felt it (I tried this, but wouldn't want to do it too much to make the soap start crumbling - I am going to try needlefelting a little design first in some wool before starting the wrapping process sometime). Looseness can be worked more - I've done it, even after it's totally dry and I want it tighter around the soap.

put the wool wrapped soap in a plastic bag
Now put the wool wrapped soap into a sandwich bag. Here is where I differ from other tutorials - they put the soap carefully into the toe of a nylon sock, usually knotting it. Wet felting with kids, as well as teaching felting in a setting where water accessibility and dripping water isn't easy, taught me to use plastic bags. And who wants to unknot something. I just put some hot water in the baggy, twist it tightly around the soap, and start rubbing all around the soap. Most wet felting has you using hot soapy water, but here you've already got the soap. It'll get quite sudsy, which would rinse out easily with a nylon sock, but I just pull the soap out and rinse it and the plastic bag, then put the soap back in if it needs more felting. When I had the Valentine Tea crafting party, we just left the bags by the greenhouse sink and people coming to that craft station reused the bags.

after adding some hot water twist the bag tight and rub all around the soap
rinse the felted soap and let it dry
Total time for the process? Only about 5-10 minutes! And you've got a unique, creative, functional work of art.

One-Use-Soap? or Homemade "Wet Ones"

One-use-soap - craft felt dipped in melted glycerin
One of the craft stations at the Valentine Tea, was a supposed one-use-soap. I say supposed because I've been using them, and the glycerin soap is lasting longer than a one-use. I started out with larger craft felt shapes, but someone at the party decided smaller would be better and I totally agree. After the party, I cut out lots of smaller hearts, dipping in the melted glycerin, set to cool on a sheet of foil, and then put them in a tea cup in our guest bathroom.

You don't need to cut out hearts (a tutorial I found did snowflakes for a Christmas party). In the future, I'm just going to use a rotary cutter, cutting small rectangles from craft felt. I want to put some in small zip-lock bags for keeping in my purse. The one-time use? Could just put them back in the bag and use till no more soap, but throwing them away after one use wouldn't be such a bad thing.

One-use-soap process
My other question still to explore is the melting temp and quick dipping. If hotter, would less glycerin adhere to the felt? Or would just very quickly dipping be the answer. Do they need to be a one-use thing? Any way, they are a very cool idea!

Materials?
Glycerin chunks - I found them at Hobby Lobby - don't get the opaque kind, if you want to see thru to felt glitter or words you write.
Something to melt the glycerin in - Dawson had gotten me a small crock pot from a second-hand store that is now designated for this function.
Tongs for dipping in the hot glycerin
Foil to lay the hot dipped pieces on to cool and harden
Craft felt - cut in small pieces

As I wrote the above word "pieces" ... I got to thinking ... There's other things that could be dipped in the glycerin for this purpose too. Has anyone explored the options? I don't use dryer sheets anymore, but they could be cut smaller and "re-purposed"! What else? ...

Thursday, February 17, 2011

Homemade Valentines

Monte makes me Valentine cards. We can't find the one he made before we were married, so he remade it several years ago. I love it!


Our kids know of his homemade cards, so this year, while people were crafting indoors at my Valentine crafting tea party, Dawson was outside in his workshop making a metal valentine for his girlfriend, Splarah.

"D-awesome's Manly Metal Message"!

Valentine Crafting Tea Party


I had a Tea Party open house. I set up craft stations all over my house. I'd sent out an Evite to a variety of people: some of them very old friends and some new. I think everyone attending knew someone, but people were conversing with lots of new people. I knew everyone! (Oh wait, no, someone brought a friend whom I did not know.)

Me in the tie-dye apron and friends
Valentine paper crafting station

The dining table was set up with the Valentine making paper station. Near it was a small table brought in from the guest room and set up with acrylic paints, glue, glitter, and sequins. Wool and homemade soap were in the greenhouse, off the dining room, for making felt covered soap. The guest room was set up as the needle felting station. The laundry room had a crayon melting craft possibility and a little crock of melted glycerin soap for a One-use-soap craft.

Felting over homemade soap station
Needlefelting craft station
Erika at the One-Use-Soap craft station
Sarah cut out the hearts and squares from my pullman loaves

I'd made the pullman loaf pan bread and all the tea sandwich makings, veggies and dips, the day before, but the morning of the tea I was making scones ... so they'd be fresh. So I didn't have my sandwiches assembled before the guests arrived. As a result, the kitchen and it's table became another craft station with my guests making the various tea sandwiches. I think they enjoyed this!

I had an electric pot with hot water and tea bag varieties, and then of course a wide variety of tea cups Monte and me got at second-hand stores. I just couldn't see people using disposable cups for a tea party! I posted a lot of the food recipes at my karey's kitchen blog (see sidebar).

Second-hand store tea cup finds

I didn't make desserts. Some people brought them. Dawson's girlfriend Splarah made beautiful cupcakes that were almost too pretty to eat!

Splarah's homemade cupcakes!
I'm going to post individual tutorials about some of the craft stations.

On the window sill by the front door I had Valentine gift bags for people to take their goodies home in. People are still telling me "thank you", and how good a time they had. I've decided this valentine crafting tea party will be a tradition.

Gift bags for taking home craft goodies
Related Posts Plugin for WordPress, Blogger...