Showing posts with label Dyeing. Show all posts

Wednesday, March 21, 2012

Ukrainian Egg Dying

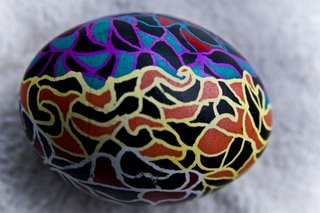
Ukrainian dyed eggs - a wax resist process
It's that time of year again. I'm just home from being gone several weeks with a new grand-daughter born. When at the little grocer I frequent the checkout gal says the fresh hams for Easter have just come in. EASTER! I've not even thought of it, let alone a meal, and who's coming our way. BUT, I also just got an email from my youngest son saying he wants to bring several groups of friends to do eggs this year. I still have the dye in canning jars from last year ... I wasn't going to buy new dye, since they can be reused. But then my other son said the same, "We want to bring some couples to dye eggs". So I'm going to order new dyes to have on hand ... just in case. Like did someone compromise the yellow last year? ...

For years I've ordered my kits/dyes from the Ukranian Gift Shop. And click here to see last years "how-to" post with lots of pics.


Wednesday, February 22, 2012

Dyed T's and socks

Stan with t-shirt and socks I dyed
Monte's partner in geology called wanting more socks. He loves my hand-dyed bamboo socks and wears them all the time. He will go down in geology history for many things, including his typical attire: Wild T-shirts with lizards, iguanas, dinosaurs, etc plus my hand-dyed ones. I did a serpentinite print from a photo on the front of a shirt and sponged on dye around it (on this shirt the print faded as he's washed it a ton, the next one I did differently). And when not in the field, he still wears shorts, even in winter and then sandals. So my socks are well exposed for all to see.

So this week when pulling out socks for both him and Monte (all my family asks for more socks), I saw that I had a t-shirt his size and decided to do one for my Grandson. Monte had also labeled a pair of his pants to be dyed black and a pull over shirt brown.

Accordian pleated and lots of clothespins

Here's Stan's shirt. I folded it accordian style from an off center at the breast then clothespinned every inch. I scrunched it into a plastic basin, along with socks and the toddler T. The dye I poured over was a mixture of 1/2 black, 1/4 cobalt blue, and 1/4 deep yellow.

Toddler T and socks
I'm sure he'll love the T and will tell me some rock tale the shirt tells.

Sunday, January 8, 2012

I made curtains for my grandson's bedroom. I knew I wanted to dye the material. After looking through all my textile books for an idea, I settled on over-dyeing them for richness and depth - the book Tray Dyeing provided the inspiration. The material is an unbleached muslin. The lining includes a blackout material, then there's a sheer behind them.

Dyeing in a tray with bottom pleated and upper scrunched, then dye poured in.

Overdyed with fuschia and chartreuse
Overdyed with black

Since I did these last summer, I'm not remembering ... I vaguely think they ended up too black, so I'd have retied and bleached them. I know I did this on aprons I dyed a couple Christmas's ago. Rather than immersion dyeing of the final black, I should do the low-water way, like the tray dyeing ... Still learning.

I do have more plans ... Making separate animals that can somehow be attached to the curtains - maybe just pinning, so removable over time. Like now the room will be shared with a little sister, our first grand-daughter. Initially, I'm thinking elephants, lions and monkeys. Maybe some birds and even flowers.

Tuesday, April 26, 2011

More Ukrainian Egg Dyeing Info

I'm cleaning up the dining room table of all the Ukrainian Egg dyeing tools. I have a box the jarred dyes return to along with all the kistka tools, candle holders, beeswax, how-to instruction sheets and then the vinyl tablecloth. This year there's cartons of undone raw eggs to put by the box in the garage too. Will I pull it all out to make Christmas tree ornaments next fall? Every year I say I will ... We'll see. Varnished, blown out, and hung with silk cord and tassel would be beautiful!


I took some pictures of eggs that got left. Gary made the egg faces. Most people took home their eggs. I save cartons prior to Easter so they can be cut up for protecting a few eggs. Like most of the gals who came to my Spring Tea did two eggs. Friends stayed on into the evening dyeing more. Then, as I was starting to put everything away the Easter weekend Dawson texted me saying he was "bringing lots of friends to dye eggs ... and by the way, we're staying for supper". I had no plans. We had homemade pizzas for supper - a dessert one with brie, chocolate chips, and sliced cranberry sauce was delicious. I want to make it again for improving the recipe.

Something I thought I should mention, to add to the dyeing instructions I've posted about, is the use of bleach. My boys are big-time into the use of bleaching their eggs. You can see in the above picture the back eggs that are quite white. Most of these started out as black eggs, waxed, and then bleached. Travis's egg with the birds and the sunset below, started out black too. He probably bleached it several times, but beware ... excessive bleaching can weaken the egg shell. I bleached one of mine, wanting a truer green after the scarlet, but I didn't wash the egg after bleaching - with soap and water! Bleach will affect the dyes. My egg didn't take the green dye evenly. I hope I didn't wreak the dark green dye. Monte's still got his serpentenite egg in there ... waiting ...

Saturday, April 16, 2011

Spring Tea Ukrainian Egg Craft

Merengues spread with jam & cookies
Veggies & 3 dips - boiled small potatoes are the favorite!
I did it again - I had another tea crafting party. Like my Valentine Tea crafting party I posted about, I invited people to tea and learn the art of Ukrainian/Pysanky egg dyeing. Needlefelting was the other craft option. I did a post about the Ukrainian wax resist dye process earlier, so see it for the details. This time I made some desert along with the sandwiches and scones (see my kitchen blog for recipes). The favorite was banana bread spread with Nutella and a Granny Smith apple slice.

Ukrainian Egg Dyeing


Ukrainian Eggs and a Needlefelted Picture


Hanna and Phill needlefelting

Relaxing, eating supper with friends


Dawson using Kistka tool with beeswax on a raw egg

Friday, April 8, 2011

Ukrainian - Pysanky - Egg Dyeing

Ukrainian - Pysanky Eggs
It's that time of year again. I've ordered more dyes, though I still have last year's dyes jarred in a box in the garage. Since more people are going to be coming to our home to do eggs this year, I thought I'd get some fresh dye. We'll use both.

I saw an article in a 1973 National Geographic Magazine on Ukrainian eggs, and wanted to do them. Since I knew how to do Batik textile art, I understood the process, but didn't know special tools existed. As is typical of me, I just jump in and do things. I got beeswax and melted it in a metal measuring cup and stood over the stove painting the wax on eggs. And the only dyes I new of were the typical grocery store Paas (?- I think that's what it is) dyes. Monte joined in the process when we were dating.


Soon after we were married I found the traditional kistka tools and special dyes. For years now we've been ordering supplies from the same store, and have bought kits for wedding presents. We've also bought a lot of extra tools and leave the dyes out for about a month and have had many people around our dining table decorating eggs. One couple, years ago so looked forward to it they started designing eggs months beforehand. When they moved away they bought their own kit and have done it every year.


Though electric kistkas exist, it's traditionally done by heating the metal funnel of the kistka over a candle till the beeswax is melted. It does not run out until it touches the egg. It's a wax-resist process, starting from lightest and getting progressively darker. You initially wax over everything you want white and put egg in yellow, once dry, you wax over what you want to stay yellow, and so on. When done you hold the egg to the side of the candle and wipe the melting wax off with a paper towel. The eggs are raw and they dry out over time.

This picture is just one of the three cartons that got done several years ago. That was a very productive and artistic weekend of eggs - Travis had several couples come and stay several days to dye eggs (and enjoy just hanging out, of coarse). Dawson has friends come too. Everyone loves it! I've gotten emails from both boys this year - going to be bringing friends again!


I cap the canning jars of dye and repack the box. I store them along with the old silver spoons, candles and candle-holders, box of tools and instructions and pictures, and then the vinyl tablecloth. It can be pulled out anytime. Every year I say I'm going to do it for Christmas ornaments - but I haven't yet.


Several years ago Monte made a shelf for the eggs to better display than the hanging wire baskets I've always kept them in. The company I order the dyes and tools from, the Ukrainian Gift Shop, has a variety of stands for the eggs. So I got a bunch of the cheap clear plastic stands. Monte is going to make a shelf unit for each of the kids too.


Having done these for years, I never varnished them and finally did a few years ago. It's a final step I've always skipped. So some of the varnished ones are older and already faded. These dyes are toxic, so no eating of the eggs, but are not run-proof, so make sure the varnish is not water-base. We nailed three nails every so often in boards to support the eggs and I use my gloved hands to rub the oil-base varnish on the eggs. (The stands could be used in the oven on low temp for helping melt the beeswax off. I've not tried this - but a book I have shows it.)


Monday, December 27, 2010

Dyed Christmas Gifts


Everyone is starting to expect gifts of dyed shirts with matching bamboo socks all the time. I did it again this Christmas. Last Christmas, besides the shirts and socks, everyone got a tie dyed apron. This year besides the shirts and socks, all the couples got a Bidet! For the Grandsons I dyed shirts, and warm rompers, matching bamboo socks, and then some hats. I was going to dye ties for the guys, as the girls got machine felted polar fleece purses - but I didn't get to them. I'm feeling a little daunted with silk ties, but will do them eventually.

The munchkin hats are adorable!

Hand-dyed had from Dharma Trading Company

Thursday, December 2, 2010

Needle-Felted Christmas Wreath, etc.

WOW!!! I've not posted in a long time. But I've been busy and taken pictures of lots of doings, so I'm going to back-date posts from here for catching up with projects closer to their date. For awhile there was lots of garden/yard clean-up as Fall carried on with a longer growing season before frosting out. And I've now got tomatoes, lettuce varieties, radishes, beets, carrots, green onions, herbs and snow peas growing in the greenhouse that's connected to the house.

We have XM Serious Radio in our house (alone - we don't have Dish or Direct TV - only Satellite radio) and I'm currently listening to Christmas Classics as I'm typing this post on my Macintosh computer, eating a Macintosh apple.

The MOPS group of which I've been a Mentor Mom for ten years had it's Christmas Brunch fundraiser yesterday. I dyed some long-sleeve T-shirts with matching bamboo socks for it. I also made a Needle-felted wreath - all a part of an auction. Now I need to make a felt wreath for ME!

The wreath is about 12" made over a styrofoam wreath form. I've found needle felting over foam does not work on the smooth foam. I learned that last Easter when I did some egg shapes. I made some ornaments I'm back posting about, and going to make more.

At my weaving guild once a year is a large sale and I pick up varieties of wools. What I used for covering the styrofoam was some junky dyed green wool - still with lanolin that's gone sticky and I'm betting dyed with Koolaid - well I'm finally putting it to use. Then I wrapped it with some yarn. I separately needled the leaves and then needled them onto the wreath. I wet felted the berries quickly with bar soap and my hands standing at the sink, squeezed them out in a towel, and almost immediately glue-gunned them onto the wreath, straight pinning thru some. (Running out of time ... last minute stuff.)

Tuesday, October 19, 2010

Bleach Painting T-shirts

Painting with bleach on T-shirts - Dawson, Splarah, Sarah, and Travis
My sons just posted pics on Facebook of an activity they did yesterday. I suppose we'd have been invited too if Monte wasn't needing to work. But I'm always glad to see family togetherness. I shared the painting with bleach technique with them awhile back. I've overdyed (bleached), like tie-dying, an already painted Tee to great affect too and stamped with bleach. I sometimes use my dye thickener, sodium alginate (sp?) added to bleach. Do this in a well-ventilated space - like outside! Rinse well and wash. If left too long bleach will eat at the fibers.

Monday, August 2, 2010

Dye Painting and Overdyeing

I'm exploring dye techniques. After doing lots of varieties of tie-dye, and fabric dye samples, I'm moving into overdye, and painting techniques. The first pic is a tie-dyed T-nightgown I gave to Sarah. Everyone in the family has been getting T-shirts and oft times, matching socks. I'm a sock person, liking them with my sandals.

I had some T's I dyed that I wasn't in love with their colors, so I started overdyeing, and I'm really liking the added depth. I did a mixture of hand-painting the dye with a brush, and then I love the sponge texture - I've used my one sponge for everything, including my home's entryway walls. The next pic is a T-shirt for Heather. It's original colors were moreso gray and gray-blues, maybe a touch of light pink and gold - I don't remember. But I spattered dye and sponged.

The next pic is of overdyeing a light blue with yellow T. Most of the extra color is with the sponge and a bit of hand-painted large ovals, like daisy petals. But then I spiraled the shirt, bound loosly with lots of rubberbands, and immersed in a bucket of black dye, leaving in for several hours. I'd made up the black dye bath a few days before. I'm always amazed at how dyes don't mix that much (unless I agitate them a lot right away). It's a chemical reaction called "striking" that happens- like in the first 15 minutes. At first I expected to rinse them and expect all dark, like they look when wet.

Most of my dyes are in 8oz squeeze bottles I store for several weeks. I'll make them up fresh when whatever I'm doing has to have very exacting colors. I don't add soda ash to my dyes because otherwise they need to be used up that day. I keep a soda ash solution in a bucket for however long it takes till it's all used up- maybe months. I soak everything I dye in the soda ash solution for about 20 minutes and wring - leaving wet for most dyeing, or hanging to dry and dry-dye later - like for batik, stenciling, stamping, and screenprinting ...

A shirt I did for Monte similar to this is blacker cuz of immersing when the dye was fresh made - he wanted a pair of brown pants to be black. All the later additions to this dyebath are more a blue-black. All blacks are made up of other colors, and those colors disperse in varying ways - like drop a blob on paper towel, and when dry, you'll see outer rings of blue or fuchsia or blue-green. As too with most colors - very few are pure colors. The operative word here is FEW - like in - 3 primary colors making up all colors.

On this note of over-dyeing clothes - I've done it for years. I've been hooked on second-hand clothes shopping since I was a teen. A lot of the baby clothes I dyed - rather than pastels - deep blues, maroons, and greens... And I've dyed bathrobes I like over and over, changing colors, till they fall apart. Monte has started looking thru all his clothes and giving me shirts to overdye. In the past he's had me dye suits for a color change too. Dawson just gave me a pattern to try and dye-paint on a shirt for him. And he gave me a black shirt he wants me to practice on - a discharging technique.

My next pic is of total hand-painting, with some spatters and sponging - a dress and matching socks. What I learned ... I LOVE the technique, tho time-consuming. Thus, I'll be moving into making my own stamps for repeat printing. And I'm going to start thickening the dye, so less running in most cases.


I'm in need of more yogurt, so while writing this post, I'm making more. I'll post yogurt making soon at my Karey's Kitchen blog. The kitchen table is full of geology related pictures I printed along with several serpentinite photos - some of them already printed on inkjet paper and ironed on fabric. This month's color challenge is "analogous" and most serpentinites are greens (tho when in Boston we saw lots of pinks-to-reds. You'd think them marble. When watching movies, Monte's always pointing out serpentinite - it's everywhere! And since, as he's talking his science lingo, he's using talk of DNA and blueprint ... I'm trying to create an Art Quilt for him. When done I'll post a pic.)

Wonder Full Creativity!

Tuesday, July 6, 2010

Tie-Dye

Knowing we were going to be gathering for 4th of July AND I needed to use up all my old dye, I tie-dyed a bunch of stuff: T-shirts, camisoles, and bamboo socks, and too, some summer onesies I'd got for the Grandbabies. So yesterday everyone got at least one shirt with matching socks.

Also, it's fun to see people using things I've made and given them. Last Christmas I tie-dyed aprons for gift-giving. Travis wears his apron all the time when cooking - especially grilling, as he did 25+pounds of ribs this 4th of July, using my mom's dad's bar-b-q sauce recipe.
Related Posts Plugin for WordPress, Blogger...