Sunday, March 20, 2011

Nuno Felting

Nuno felted silk scarf
I've done felting for years - starting with wet felted pictures, hats and slippers. I've done knitted items that are then wet felted by throwing them in the washer with towels or jeans. I've done lots of needlefelted pictures and sculpting. But I've never done nuno felting.


Nuno felting utilizes a sheer type of fabric with wool. It's wet felted very gently and with cooler temp soapy water so that the wool fibers will slowly get worked into the fabric. Once the wool has migrated into the material, then the soapy water temp should be hotter and you can roll and agitate the material more.

'Shingle' the wool onto the sheer material


The first thing I tried was a silk organza scarf and varieties of wools in coordinating colors. I put the painting blue tape on the table first so I'd know the original outline of the scarf. This is only important if you are going to be laying out wool for both sides of the scarf. I put down plastic, then bubble wrap, then a mesh curtain material, and laid out the wool, and then the scarf and then more wool fiber on top. All this was encased in polyester sheer curtain material, wet with cool/warm soapy water. Roll up in bubblewrap and gently roll - like 100 times, turning the roll. Unroll and roll up again from the other end of the scarf and gently roll another 100 times. Unroll and roll tighter and rolling tougher. Check to see if the wool is migrating through the material. Squeeze out excess water and do it all again with hot soapy water. Then I started squeezing and rinsing at the sink with changing water temps, and even throwing the scarf into the sink. (I found some great tutorials on YouTube.)

Finished silk scarf

After making the scarf, I did some practice pieces using cotton gauze material and black merino wool. The wool does shrink, pulling in the material some, and I wanted to test the amounts of wool, so did a variety of designs. I might make a blouse with these test pieces.

Nuno felting on cotton gauze material with merino wool
I want to practice this technique more.

Thursday, March 17, 2011

St Patrick Quilt

I almost forgot ... it's St Patrick's Day! I made a quilted piece years ago for adorning the dining table at this time. I had some gals over for a tea lunch and felting last Saturday and pulled out this quilt for the table and it's been out since.

When I was looking for patterns, all clover leaf patterns were with four leaves. Since Patrick used a three-leaf clover to talk about the Trinitarian God, I wanted three leaves as well, so had to create my own quilt pattern.

"Tapestry" Knit Shawl - Finally Done!

"Tapestry" knit shawl
I started knitting this shawl over 1 1/2 years ago from a kit I bought from KnitPicks. The circular needle was 60" long. I've blocked it and it measures 22 x 65 inches. Now for a backing material - going to get a light brown cashmere type wool. It has to be backed because of all the knotted yarn. I call it "tapestry" because I left strands of wool hanging, to be knit when coming to that place in the following rows. As in tapestry weaving, you have to twist the two yarns at each color change to prevent holes or slits. This is the hardest thing I've ever knit, and it was easiest to leave it sit by the couch we sit on as we watch movies. I finished about 2 rows per movie! So I figure the piece averages about 72 movies!!! Though I didn't totally knit it while watching movies - I like to take bigger projects as we travel. I'll knit while listening to audio books too ...


Watercolor Craft

The MOPS craft yesterday was watercolor painting on note-cards. I'm a MOPS Mentor Mom (Mothers Of Preschoolers), now into my 11th year, and watercolor painting for the craft was a 1st. It really was fun, and walking around, everyone's was uniquely wonderful! A guest artist came well prepared for working with a large group. Here's two favorites that I did -

Thursday, March 10, 2011

Machine Thread Painted Landscape


with a flash
I'm finding I love sewing machine "painting"! And too, doing it on soluble fabric. I did this landscape picture as my final project for my color-design class.

Painted Lady butterfly machine stitched on soluble fabric
Over a month ago I did the butterflies. I placed the soluble fabric on butterfly pictures in a book and traced them, trying to circle most of the larger color changing areas. I traced several and then put in an embroidery hoop - without this it would totally draw in, as you're stitching so heavily. Since the butterflies (and too, the separate flowers in the picture) were to be free-form as a lace, I used colored sewing machine thread in the bobbin. When I'm mass stitching a piece and the back won't be showing, I use a very thin thread, like a #50-60, in the bobbin - and it's kinda white, actually more clear.

When stitching on soluble fabric, the main need is to have a base of crossing threads to support the shape when no fabric is there. Most of the time I'll leave the same bobbin color and just keep changing the top thread color. As long as there's the base threads, you can have gaps in your stitching. When done, simply run water over the project to dissolve the stabilizer. If you want to do more handstitching and/or add beads, it's easiest to do it while still on the soluble fabric. Usually, I pin the structure first onto a styrofoam backing and then run the water over it to dissolve the stabilizer. Then let it dry. Depending on how much you rinse it, the stabilizer leaves a stiffening residue, if you so desire - which I did for this piece.

I did an acrylic paint wash on the coarse-weave fabric. First I'd ironed on a circle of freezer paper as a paint resist for the sun. When done and dried I found I preferred the back of the material - a bit more vague. There is a thin batting behind the piece. Originally I did the trees before adding the batting, then stitched a bit more over them in the final stitching with the batting, as well as some sky stitching.

background flowers free-form machine stitched over print on lutrador
The front detailed flower panel was done separately. Rather than an image transfer like I usually do, I printed on lutrador - a new to the craft world material, like a spun, not woven, interfacing. I printed a flower picture from my computer of an area of my yard. I then ironed the printed lutrador with wonder-under to a piece of the same background material. Being smaller, it's easier to maneuver for free-form stitching. And too, I don't have to worry about how much the heavy stitching is going to draw in. Actually, with the weight of the lutrador and wonder-under it hardly drew in, and was nice to work with, without having to be in an embroidery hoop. Here's where I didn't worry about the bobbin color, just leaving the thin thread. Of course, as you can see, the top thread was changed a lot. I just keep shifting from place to place, flower to flower, and eventually cut the stretched across threads. I love variegated threads! Once done, this piece was stitched onto the backing. I free-form stitched the edging so it wasn't just a straight-stitched seam - how non-nature that would have been!

without a flash
Monte's going to make an earthy wood frame for this. And we're pondering a unique matting - if we want one. I want to do a small version of this with one butterfly for Monte's mother. She's intrigued, and descriptions over the phone, including photos, don't do it justice. Art definitely need be met in person!

Friday, February 25, 2011

Baby Shower Gifts

It says it all!
What to make (I always go there first before considering buying something) for a new baby boy? Typical me, I googled it. Lots of fun ideas, but I settled on the PeePee TeePee for WeeWee idea. How did we survive baby boy diaper changing without them? Not necessary, I know. But I thought, "how cute and fun is that?"! I saw them online for sale with a bag for around $10. I used markers for the words on the bag and sewed a channel for a drawstring closure when hemming the top. My time? Maybe 1 hour. That's easier for me than driving out shopping or needing to plan ahead and order online.

when I sew I always start another seam so no thread tails to cut off
I drew a 7" diameter circle using a small plate on flannel material. I folded the circles in half, right sides together, sewing around, leaving an opening for turning right-side-out. You could cut your circles in half, using differing flannel designs or colors for variety if you want. Once turned out just sew the opening closed as you sew the two sides into a cone. I think I did an extra step, probably unnecessary, I sewed a 1/8" seam around the circle edge of the turned out piece. I was thinking of lots of washings and wondering if it needed this for keeping it's shape. Someone would need to tell me since I don't use them. 


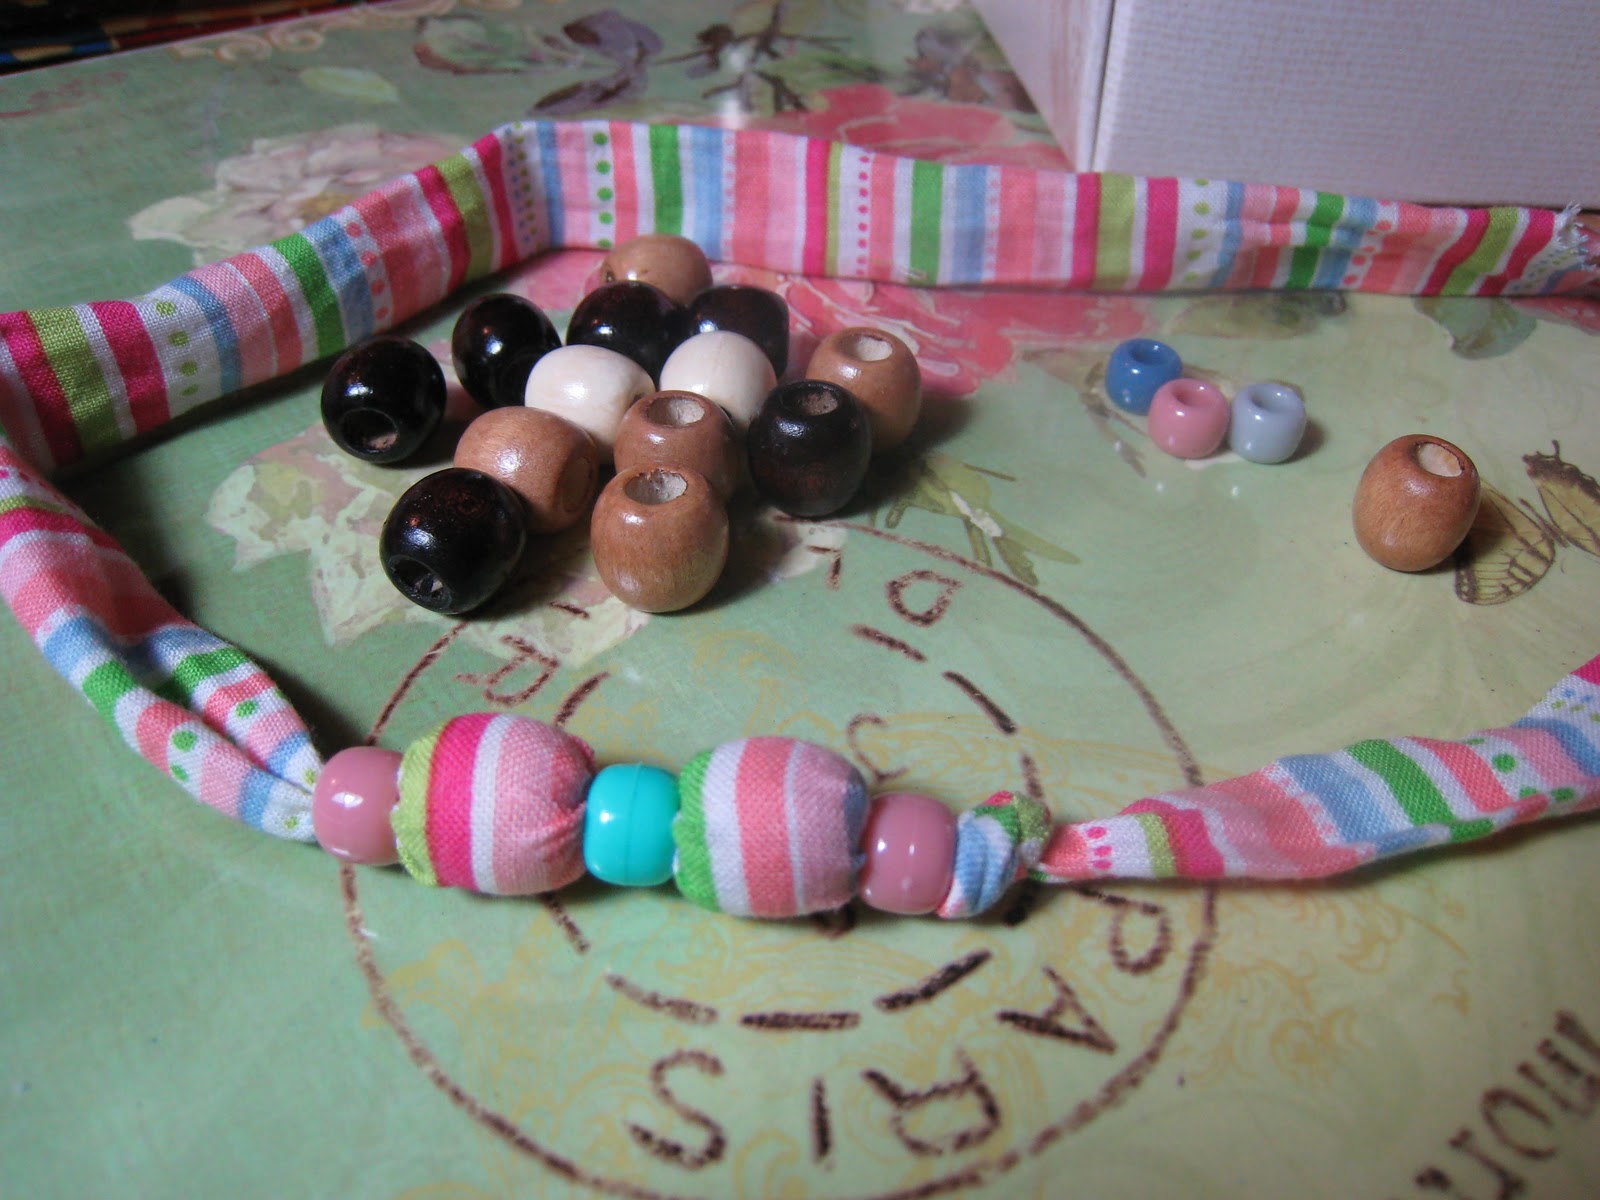
And too, if there's a young sibling, I think they should have a gift to open! This baby boy has a 4 or 5-year old sister, so I made her a bracelet. Years ago a necklace craft was popular: sew a fabric tube, turning right side out, and insert marbles or beads into the tube, separating them by a pony bead. I didn't do any clasp closure, but left a longer tube tail for tying.

fabric bracelet or necklace

You need to measure the diameter of your marbles or beads for the fabric tube diameter. Sewing a 1/4" seam with right side enclosed, I think I cut the fabric strip about 2" wide. If making a necklace, lots of marbles can get heavy, so cheap wooden balls or beads are better, I think (I've not priced marbles). When I did the necklaces years ago I used the marbles for some weight, but also used a wad of stuffing occasionally.

Insert beads and thread beads knotting ends when done
Any kinds of spacer-type beads can be used as long as the fabric can thread through. There's lots of possibilities - like dangling charms ...

The little girl loves her bracelet. I also tye-dyed a baby onesie for him too - maybe more useful than the tee-pees ...

There's a fulfillment in making things. Crafting moments open up an energy door for me.

Friday, February 18, 2011

Felted Soap or Soap in a Sweater!

"Soap in a Sweater" - felted soap
Felting over soap is SO easy. I've read and watched several tutorials. I'm going to tell you how I do it. You can use any soap. I've even done it using hotel soaps. But usually I use my homemade soap (which I posted a recipe for at my kitchen blog), primarily because that's the main soap around my house, since I've been making and using my homemade soap for probably twenty years now. Since the last soap I made was heart-shaped, that's what this tutorial will show.

wrap wool tightly around the soap
add some color variety if you want
 Wrap wool tightly around the soap, covering it totally. If you leave it too loose, it'll take longer to tighten/shrink around the soap, and you can end up with some wool flaps that are impossible to adhere to the already felted soap. Once wool is felted it won't accept anymore wool layering, unless you needle felt it (I tried this, but wouldn't want to do it too much to make the soap start crumbling - I am going to try needlefelting a little design first in some wool before starting the wrapping process sometime). Looseness can be worked more - I've done it, even after it's totally dry and I want it tighter around the soap.

put the wool wrapped soap in a plastic bag
Now put the wool wrapped soap into a sandwich bag. Here is where I differ from other tutorials - they put the soap carefully into the toe of a nylon sock, usually knotting it. Wet felting with kids, as well as teaching felting in a setting where water accessibility and dripping water isn't easy, taught me to use plastic bags. And who wants to unknot something. I just put some hot water in the baggy, twist it tightly around the soap, and start rubbing all around the soap. Most wet felting has you using hot soapy water, but here you've already got the soap. It'll get quite sudsy, which would rinse out easily with a nylon sock, but I just pull the soap out and rinse it and the plastic bag, then put the soap back in if it needs more felting. When I had the Valentine Tea crafting party, we just left the bags by the greenhouse sink and people coming to that craft station reused the bags.

after adding some hot water twist the bag tight and rub all around the soap
rinse the felted soap and let it dry
Total time for the process? Only about 5-10 minutes! And you've got a unique, creative, functional work of art.

One-Use-Soap? or Homemade "Wet Ones"

One-use-soap - craft felt dipped in melted glycerin
One of the craft stations at the Valentine Tea, was a supposed one-use-soap. I say supposed because I've been using them, and the glycerin soap is lasting longer than a one-use. I started out with larger craft felt shapes, but someone at the party decided smaller would be better and I totally agree. After the party, I cut out lots of smaller hearts, dipping in the melted glycerin, set to cool on a sheet of foil, and then put them in a tea cup in our guest bathroom.

You don't need to cut out hearts (a tutorial I found did snowflakes for a Christmas party). In the future, I'm just going to use a rotary cutter, cutting small rectangles from craft felt. I want to put some in small zip-lock bags for keeping in my purse. The one-time use? Could just put them back in the bag and use till no more soap, but throwing them away after one use wouldn't be such a bad thing.

One-use-soap process
My other question still to explore is the melting temp and quick dipping. If hotter, would less glycerin adhere to the felt? Or would just very quickly dipping be the answer. Do they need to be a one-use thing? Any way, they are a very cool idea!

Materials?
Glycerin chunks - I found them at Hobby Lobby - don't get the opaque kind, if you want to see thru to felt glitter or words you write.
Something to melt the glycerin in - Dawson had gotten me a small crock pot from a second-hand store that is now designated for this function.
Tongs for dipping in the hot glycerin
Foil to lay the hot dipped pieces on to cool and harden
Craft felt - cut in small pieces

As I wrote the above word "pieces" ... I got to thinking ... There's other things that could be dipped in the glycerin for this purpose too. Has anyone explored the options? I don't use dryer sheets anymore, but they could be cut smaller and "re-purposed"! What else? ...

Thursday, February 17, 2011

Homemade Valentines

Monte makes me Valentine cards. We can't find the one he made before we were married, so he remade it several years ago. I love it!


Our kids know of his homemade cards, so this year, while people were crafting indoors at my Valentine crafting tea party, Dawson was outside in his workshop making a metal valentine for his girlfriend, Splarah.

"D-awesome's Manly Metal Message"!

Valentine Crafting Tea Party


I had a Tea Party open house. I set up craft stations all over my house. I'd sent out an Evite to a variety of people: some of them very old friends and some new. I think everyone attending knew someone, but people were conversing with lots of new people. I knew everyone! (Oh wait, no, someone brought a friend whom I did not know.)

Me in the tie-dye apron and friends
Valentine paper crafting station

The dining table was set up with the Valentine making paper station. Near it was a small table brought in from the guest room and set up with acrylic paints, glue, glitter, and sequins. Wool and homemade soap were in the greenhouse, off the dining room, for making felt covered soap. The guest room was set up as the needle felting station. The laundry room had a crayon melting craft possibility and a little crock of melted glycerin soap for a One-use-soap craft.

Felting over homemade soap station
Needlefelting craft station
Erika at the One-Use-Soap craft station
Sarah cut out the hearts and squares from my pullman loaves

I'd made the pullman loaf pan bread and all the tea sandwich makings, veggies and dips, the day before, but the morning of the tea I was making scones ... so they'd be fresh. So I didn't have my sandwiches assembled before the guests arrived. As a result, the kitchen and it's table became another craft station with my guests making the various tea sandwiches. I think they enjoyed this!

I had an electric pot with hot water and tea bag varieties, and then of course a wide variety of tea cups Monte and me got at second-hand stores. I just couldn't see people using disposable cups for a tea party! I posted a lot of the food recipes at my karey's kitchen blog (see sidebar).

Second-hand store tea cup finds

I didn't make desserts. Some people brought them. Dawson's girlfriend Splarah made beautiful cupcakes that were almost too pretty to eat!

Splarah's homemade cupcakes!
I'm going to post individual tutorials about some of the craft stations.

On the window sill by the front door I had Valentine gift bags for people to take their goodies home in. People are still telling me "thank you", and how good a time they had. I've decided this valentine crafting tea party will be a tradition.

Gift bags for taking home craft goodies

Monday, January 31, 2011

Homemade Valentine Soap

Homemade soap - paprika created the pink soap
I made homemade soap Saturday. It's supposed to sit in it's box for 24-48 hours, before cutting into shapes and cured for 2 weeks, at the least. I was thinking "Valentines" so cut heart shapes. The leftover scraps I roll in balls. Since the soap is uncured, it's still caustic, so I dump it out on a vinyl table cloth and use rubber gloves. I've let them cure on my baking cooling racks, or brown paper before - this time they're on some old wicker placemats. The soapmaking recipe is at my Karey's Kitchen blog.

Using a cookie cutter for the heart-shape - rolling scraps into soap balls
Some of these will get felted over in two weeks. I'll post pics then ... so keep tuned.

Saturday, January 29, 2011

"Coraline" - Tiny Knitting


I LOVE what this lady knits (and I like the sweater she's wearing - I wish I could see all of it). For years (since 2003, since that's the pattern's copyright) I've been knitting special earrings for friends - I use US size 0000 double-pointed needles - they're like metal toothpicks. The pattern is called Los Lobe Hose by Carol's Sockery. The pattern came with the needles.


I have a basket of colored yarn - basically like string. I'd like to know what the lady is using in the YouTube clip. I don't think I'd knit what she's knitting, but who knows ... They are beautiful!
Related Posts Plugin for WordPress, Blogger...