Friday, February 18, 2011

Felted Soap or Soap in a Sweater!

"Soap in a Sweater" - felted soap
Felting over soap is SO easy. I've read and watched several tutorials. I'm going to tell you how I do it. You can use any soap. I've even done it using hotel soaps. But usually I use my homemade soap (which I posted a recipe for at my kitchen blog), primarily because that's the main soap around my house, since I've been making and using my homemade soap for probably twenty years now. Since the last soap I made was heart-shaped, that's what this tutorial will show.

wrap wool tightly around the soap
add some color variety if you want
 Wrap wool tightly around the soap, covering it totally. If you leave it too loose, it'll take longer to tighten/shrink around the soap, and you can end up with some wool flaps that are impossible to adhere to the already felted soap. Once wool is felted it won't accept anymore wool layering, unless you needle felt it (I tried this, but wouldn't want to do it too much to make the soap start crumbling - I am going to try needlefelting a little design first in some wool before starting the wrapping process sometime). Looseness can be worked more - I've done it, even after it's totally dry and I want it tighter around the soap.

put the wool wrapped soap in a plastic bag
Now put the wool wrapped soap into a sandwich bag. Here is where I differ from other tutorials - they put the soap carefully into the toe of a nylon sock, usually knotting it. Wet felting with kids, as well as teaching felting in a setting where water accessibility and dripping water isn't easy, taught me to use plastic bags. And who wants to unknot something. I just put some hot water in the baggy, twist it tightly around the soap, and start rubbing all around the soap. Most wet felting has you using hot soapy water, but here you've already got the soap. It'll get quite sudsy, which would rinse out easily with a nylon sock, but I just pull the soap out and rinse it and the plastic bag, then put the soap back in if it needs more felting. When I had the Valentine Tea crafting party, we just left the bags by the greenhouse sink and people coming to that craft station reused the bags.

after adding some hot water twist the bag tight and rub all around the soap
rinse the felted soap and let it dry
Total time for the process? Only about 5-10 minutes! And you've got a unique, creative, functional work of art.

One-Use-Soap? or Homemade "Wet Ones"

One-use-soap - craft felt dipped in melted glycerin
One of the craft stations at the Valentine Tea, was a supposed one-use-soap. I say supposed because I've been using them, and the glycerin soap is lasting longer than a one-use. I started out with larger craft felt shapes, but someone at the party decided smaller would be better and I totally agree. After the party, I cut out lots of smaller hearts, dipping in the melted glycerin, set to cool on a sheet of foil, and then put them in a tea cup in our guest bathroom.

You don't need to cut out hearts (a tutorial I found did snowflakes for a Christmas party). In the future, I'm just going to use a rotary cutter, cutting small rectangles from craft felt. I want to put some in small zip-lock bags for keeping in my purse. The one-time use? Could just put them back in the bag and use till no more soap, but throwing them away after one use wouldn't be such a bad thing.

One-use-soap process
My other question still to explore is the melting temp and quick dipping. If hotter, would less glycerin adhere to the felt? Or would just very quickly dipping be the answer. Do they need to be a one-use thing? Any way, they are a very cool idea!

Materials?
Glycerin chunks - I found them at Hobby Lobby - don't get the opaque kind, if you want to see thru to felt glitter or words you write.
Something to melt the glycerin in - Dawson had gotten me a small crock pot from a second-hand store that is now designated for this function.
Tongs for dipping in the hot glycerin
Foil to lay the hot dipped pieces on to cool and harden
Craft felt - cut in small pieces

As I wrote the above word "pieces" ... I got to thinking ... There's other things that could be dipped in the glycerin for this purpose too. Has anyone explored the options? I don't use dryer sheets anymore, but they could be cut smaller and "re-purposed"! What else? ...

Thursday, February 17, 2011

Homemade Valentines

Monte makes me Valentine cards. We can't find the one he made before we were married, so he remade it several years ago. I love it!


Our kids know of his homemade cards, so this year, while people were crafting indoors at my Valentine crafting tea party, Dawson was outside in his workshop making a metal valentine for his girlfriend, Splarah.

"D-awesome's Manly Metal Message"!

Valentine Crafting Tea Party


I had a Tea Party open house. I set up craft stations all over my house. I'd sent out an Evite to a variety of people: some of them very old friends and some new. I think everyone attending knew someone, but people were conversing with lots of new people. I knew everyone! (Oh wait, no, someone brought a friend whom I did not know.)

Me in the tie-dye apron and friends
Valentine paper crafting station

The dining table was set up with the Valentine making paper station. Near it was a small table brought in from the guest room and set up with acrylic paints, glue, glitter, and sequins. Wool and homemade soap were in the greenhouse, off the dining room, for making felt covered soap. The guest room was set up as the needle felting station. The laundry room had a crayon melting craft possibility and a little crock of melted glycerin soap for a One-use-soap craft.

Felting over homemade soap station
Needlefelting craft station
Erika at the One-Use-Soap craft station
Sarah cut out the hearts and squares from my pullman loaves

I'd made the pullman loaf pan bread and all the tea sandwich makings, veggies and dips, the day before, but the morning of the tea I was making scones ... so they'd be fresh. So I didn't have my sandwiches assembled before the guests arrived. As a result, the kitchen and it's table became another craft station with my guests making the various tea sandwiches. I think they enjoyed this!

I had an electric pot with hot water and tea bag varieties, and then of course a wide variety of tea cups Monte and me got at second-hand stores. I just couldn't see people using disposable cups for a tea party! I posted a lot of the food recipes at my karey's kitchen blog (see sidebar).

Second-hand store tea cup finds

I didn't make desserts. Some people brought them. Dawson's girlfriend Splarah made beautiful cupcakes that were almost too pretty to eat!

Splarah's homemade cupcakes!
I'm going to post individual tutorials about some of the craft stations.

On the window sill by the front door I had Valentine gift bags for people to take their goodies home in. People are still telling me "thank you", and how good a time they had. I've decided this valentine crafting tea party will be a tradition.

Gift bags for taking home craft goodies

Monday, January 31, 2011

Homemade Valentine Soap

Homemade soap - paprika created the pink soap
I made homemade soap Saturday. It's supposed to sit in it's box for 24-48 hours, before cutting into shapes and cured for 2 weeks, at the least. I was thinking "Valentines" so cut heart shapes. The leftover scraps I roll in balls. Since the soap is uncured, it's still caustic, so I dump it out on a vinyl table cloth and use rubber gloves. I've let them cure on my baking cooling racks, or brown paper before - this time they're on some old wicker placemats. The soapmaking recipe is at my Karey's Kitchen blog.

Using a cookie cutter for the heart-shape - rolling scraps into soap balls
Some of these will get felted over in two weeks. I'll post pics then ... so keep tuned.

Saturday, January 29, 2011

"Coraline" - Tiny Knitting


I LOVE what this lady knits (and I like the sweater she's wearing - I wish I could see all of it). For years (since 2003, since that's the pattern's copyright) I've been knitting special earrings for friends - I use US size 0000 double-pointed needles - they're like metal toothpicks. The pattern is called Los Lobe Hose by Carol's Sockery. The pattern came with the needles.


I have a basket of colored yarn - basically like string. I'd like to know what the lady is using in the YouTube clip. I don't think I'd knit what she's knitting, but who knows ... They are beautiful!

Friday, January 28, 2011

Transparency

My last class challenge was transparency. Of coarse we think of see-throughness - and that's what I did. Alot of the gals in my class are art quilters - they have a harder time with this challenge. Think about it ... most cloth is opaque. So they have to think in terms of "illusion of transparency", or implied see-throughness. When I googled that phrase there was a little more possibilities given in what we were presented with.

Heather Thomas, my instructor, said to first choose the "child" fabric, then pick out the two "parents". Transparency is achieved when two colors (parents) are seemingly overlapped on top of each other to make a 'child' - like a quilted scene of overlapping balloons was one she showed.

Organza and tulle bottles without a flash
Organza and tulle bottles with a flash
Bottles and Butterflies were forever in my mind the whole month. I did thread paint four butterflies on soluble stabilizer and added some beads, but will probably use them in this month's challenge. I did do my bottles using tulle and organza. I used a tacky soluble stabilizer for them - the materials were not wanting to stay in place, and then I could stitch them together, dissolved away the stabilizer in water, and pinned it to dry. I'd washed a background material with fabric paint, but decided they looked best on black. So wonder-undered a black tulle over black craft felt (helped the craft felt look richer). Then I pinned on my bottles and stitched through all the layers doing a bit more thread painting for the light glare on the bottles.

I was enjoying playing with the organza and tulle so wonder-undered a lot of the colors, so to trace 'mountains' and 'moons' and iron them onto black cotton fabric. Should have used Steam-a-seam, as it would adhere better to the meshed materials. Once I completed the massing of the piece, I looked at the black pile of material left on the floor from when my son and friends were here sewing, and realized that all the blacks were not the same. I found I didn't have much left of the black I started with, so did two boarders, one narrow. I straight stitch quilted thru the layers around each 'moon over the mountain' rectangle. Then couched a variegated shimmery yarn on the outside edge of the narrow boarder. I'm going to face it rather than bind the edges. Still wondering about quilting it more tho.

Moon Over Mountain without a flash
Moon Over Mountain with a flash

Thursday, January 27, 2011

Kumihimo Braiding

Kumihimo "Marudai" braiding device
Kumihimo is Japanese braid-making. Kumi means 'coming together', and himo is 'string, cord, rope, or braid'. I first learned to do this braiding on a square cardboard years ago. I knew of the beautiful wooden stand and weighted thread spools, and was about to try making my own, when I found a used one with 8 spools. I love it. I love, and USE all my tools!


There are many braid varieties made from 4, 8, 12, and 16 bobbins. I always do the eight and the same cord progression pattern all the time - no thinking, just a peaceful motion. Since I'm using varied colors, just trying to coordinate with what I'm making it for, it creates it's own pattern. I've made Kumihimo braids for most of my hanging felted pictures - those, using my handspun and dyed yarns.


This braiding is with crochet cotton thread, and it makes a narrower braid than with the yarn. I'm weaving this for the grandson's cloth alphabet books I made. Looking at it, Monte wants me to make him shoelaces!!


The bobbins are weighted and then a central counterweight is needed, attached to the braided cord. They typically put weights in a little silk bag. My counterweight is what I started with - a baby food jar filled with sand. I should make a cute bag!


When I begin and whenever I've got to move the counterweight back up close to the top, I put a chopstick thru some of the strings under the top hole. I used to wrap a rubberband around the threaded bobbins, but now I'm getting used to the twisted thread loop making it's own stopping point (so it doesn't just drop, roll, and unwind - which it will do if you don't have the string to the back as in illustration #1 above).

The felted picture is one of my earliest pieces, before I was doing needle-felting. It's wet-felted with embroidered details. I've made several of these pictures, not with embroidery tho, but needlefelted details, and sold them. The Kumihimo braid is for hanging the piece from a dowel on the back incased in a sleeve. I also attached the braid around the picture - an added twist, separating it from the felted frame.


Wet felted and embroidered - with Kumihimo Braiding

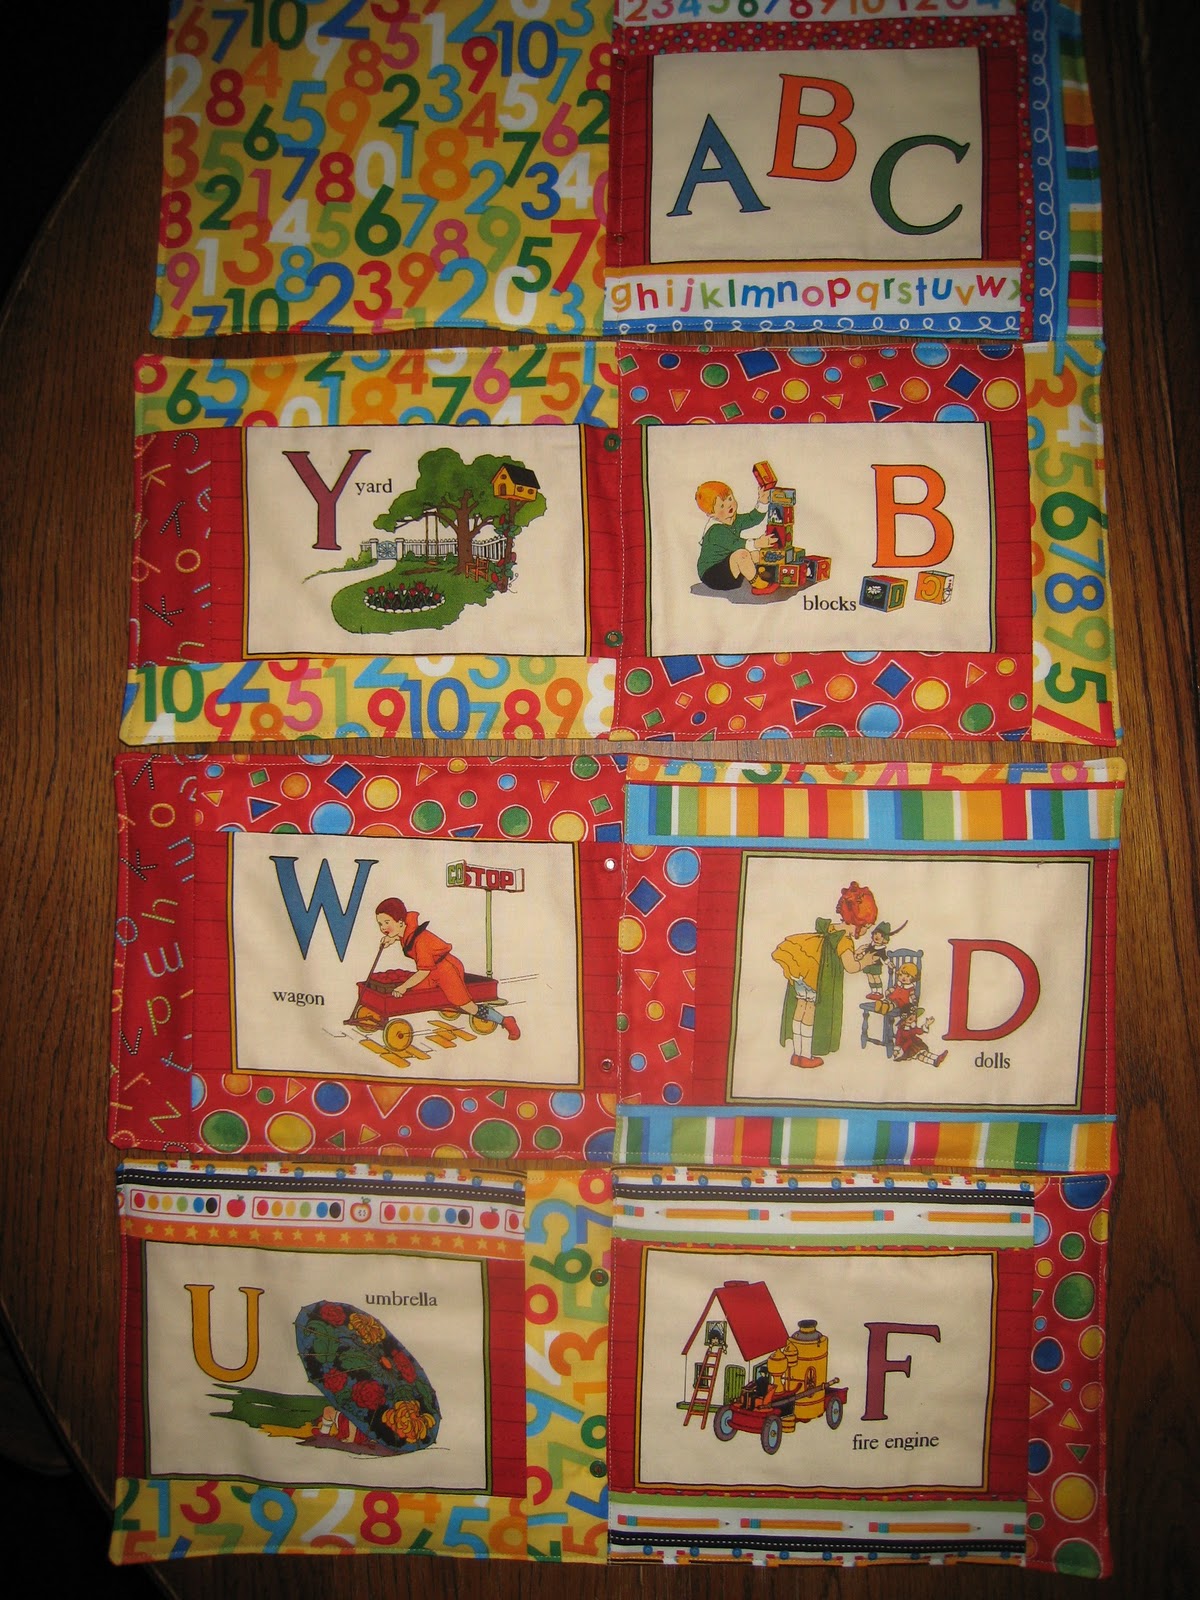
Cloth Alphabet Book

Cloth Alphabet Book
For several months now, when I've gone to my Language of Color & Design class, I've seen this material panel of an old-fashion alphabet, and I finally bought two panels. Then I also got several fat quarters of kid material to go with the panel colors and theme. It would have been easier to just make blankets from the panel, but no, I have to go all out ...

I made two cloth books for the Grandson's birthdays. Emery's first in January and Will's second, coming up early February. Now that I've finished Will's, with more improvements, I want to undo Emery's a bit and improve it also.

When my kids were growing up, they'd often tell us their dreams, or have adventures, or create an imaginary something. So we sometimes made these into books - paper-bound books with covers - books added to the book shelves and would be taken out and read. I wish we would have done more of this. I'll make blank books now for journalling, which is easy. But when you're assembling pages of ordered text, it takes a lot of thinking.

I was doing fine till the other day, one of Will's pages did not have the alphabet going in the right order, and might have even been upside-down, when placed in the page's order. It's best to have a table to do a complete layout on, and keep checking for correct positioning before putting together the whole page, with batting sandwiching, turned right-side-out and edge stitched along the outside edges and down the middle, closing the open part for turning. That was a lot of stitch ripping!

For Emery's I sewed the pages down the middle (had to do sections, as it was too thick to totally sew through it all - that's how we did our paper books - just sewed with a basting stitch on the machine down the middle of all the pages (I'll have to do a post on our paper homemade books). For Will's I bought some colored eyelets, punched holes and added the eyelets. Rather than use ribbon or yarn, I thought a braid would be stronger, so I wove a Kumihimo braid (I'll do a separate post on this) of crochet cotton threads - crayon colors. That threaded through the eyelets and tied holds the book together.

I like the old-fashion pictures and some of the words are no longer used - I didn't know them! I like how they turned out. I'm going to be making some more cloth books soon. One idea is to do some family photo transfers so they can look at family pictures and remember! Then there's always the activity book ideas.

Wednesday, January 26, 2011

Gandhi using a Spinning Wheel in India - Gandhi video footage


I'm posting this because as a spinner, I knew Gandhi spun, and worked at getting a lot of people to spin. It's a way for people to earn an income. But it's also a very peaceful tactile activity to do.

We just went to the National Western Stock Show; here in Denver every January. I used to demonstrate spinning, and sometimes weaving, at it a lot. I've demonstrated spinning at many other places too. I should demonstrate again - a great way to get more yarn! I've knit two sweaters and a shawl from my handspun and dyed sheep wool.

Gandhi is spinning cotton. It's a very short fiber. At a weaving guild sale years ago I bought a large box of cotton. I've been scared to spin it, but now, having read about a new book coming out by Rita Buchanan - Spinning Cotton - I'm going to challenge myself to give spinning cotton a try this year. More than a try, but tackle it till I get it!

A shawl I knit from my handspun wool

Monday, December 27, 2010

Dyed Christmas Gifts


Everyone is starting to expect gifts of dyed shirts with matching bamboo socks all the time. I did it again this Christmas. Last Christmas, besides the shirts and socks, everyone got a tie dyed apron. This year besides the shirts and socks, all the couples got a Bidet! For the Grandsons I dyed shirts, and warm rompers, matching bamboo socks, and then some hats. I was going to dye ties for the guys, as the girls got machine felted polar fleece purses - but I didn't get to them. I'm feeling a little daunted with silk ties, but will do them eventually.

The munchkin hats are adorable!

Hand-dyed had from Dharma Trading Company

Thursday, December 16, 2010

December Color/Design Challenge

"TEMPERATURE" was the next classes' challenge. Heather Thomas said, "we want to feel either hot or cold when we view your piece!" Visual temperature is controlled by color. The color wheel can be divided in two halves, one warm and one cold. The cold colors tend to recede behind warm colors. Red-violet, red, yellow-green, and green are temperature neutral colors, tending to behave like their neighbors. Adding black to colors warms them. Adding white actually cools colors down. Colors have moods.

I initially printed some of Dawson's photos and photo-image-transferred a white deer with it snowing. I heavily thread painted it and it puckered. My teacher of the class, Heather, said, "when I'm going to stitch the hell out of something, I print two, cut out the heavily stitched image and attach it to the background." I still need to do that and finish it. I want to frame it and give it to Dawson.

What I did was look thru all my stash of material and lots of unfinished stuff. I chose a weaving project I did, feeling it cold. I'd previously knit and felted a black bag I didn't like cuz lint and stuff showed too much. So I attached my woven piece to the purse. I also looked thru my stash of trims and ribbons, hoping for something to embellish the purse. I found some daisy trim that could have come from my Grandmother. Over the years I've collected lots of trims and buttons from yard sales. Sometimes at a second-hand store I'll buy a shirt for it's buttons if they're cool. Then I found some coordinating material for lining and making some buttons. I wanted a brighter lining material as I've found it's hard to find things in a dark bag!

Felted purse with attached hand-weaving, trim, and homemade buttons
Related Posts Plugin for WordPress, Blogger...